Translate

Saturday 31 October 2015

Who's turning Fifty???


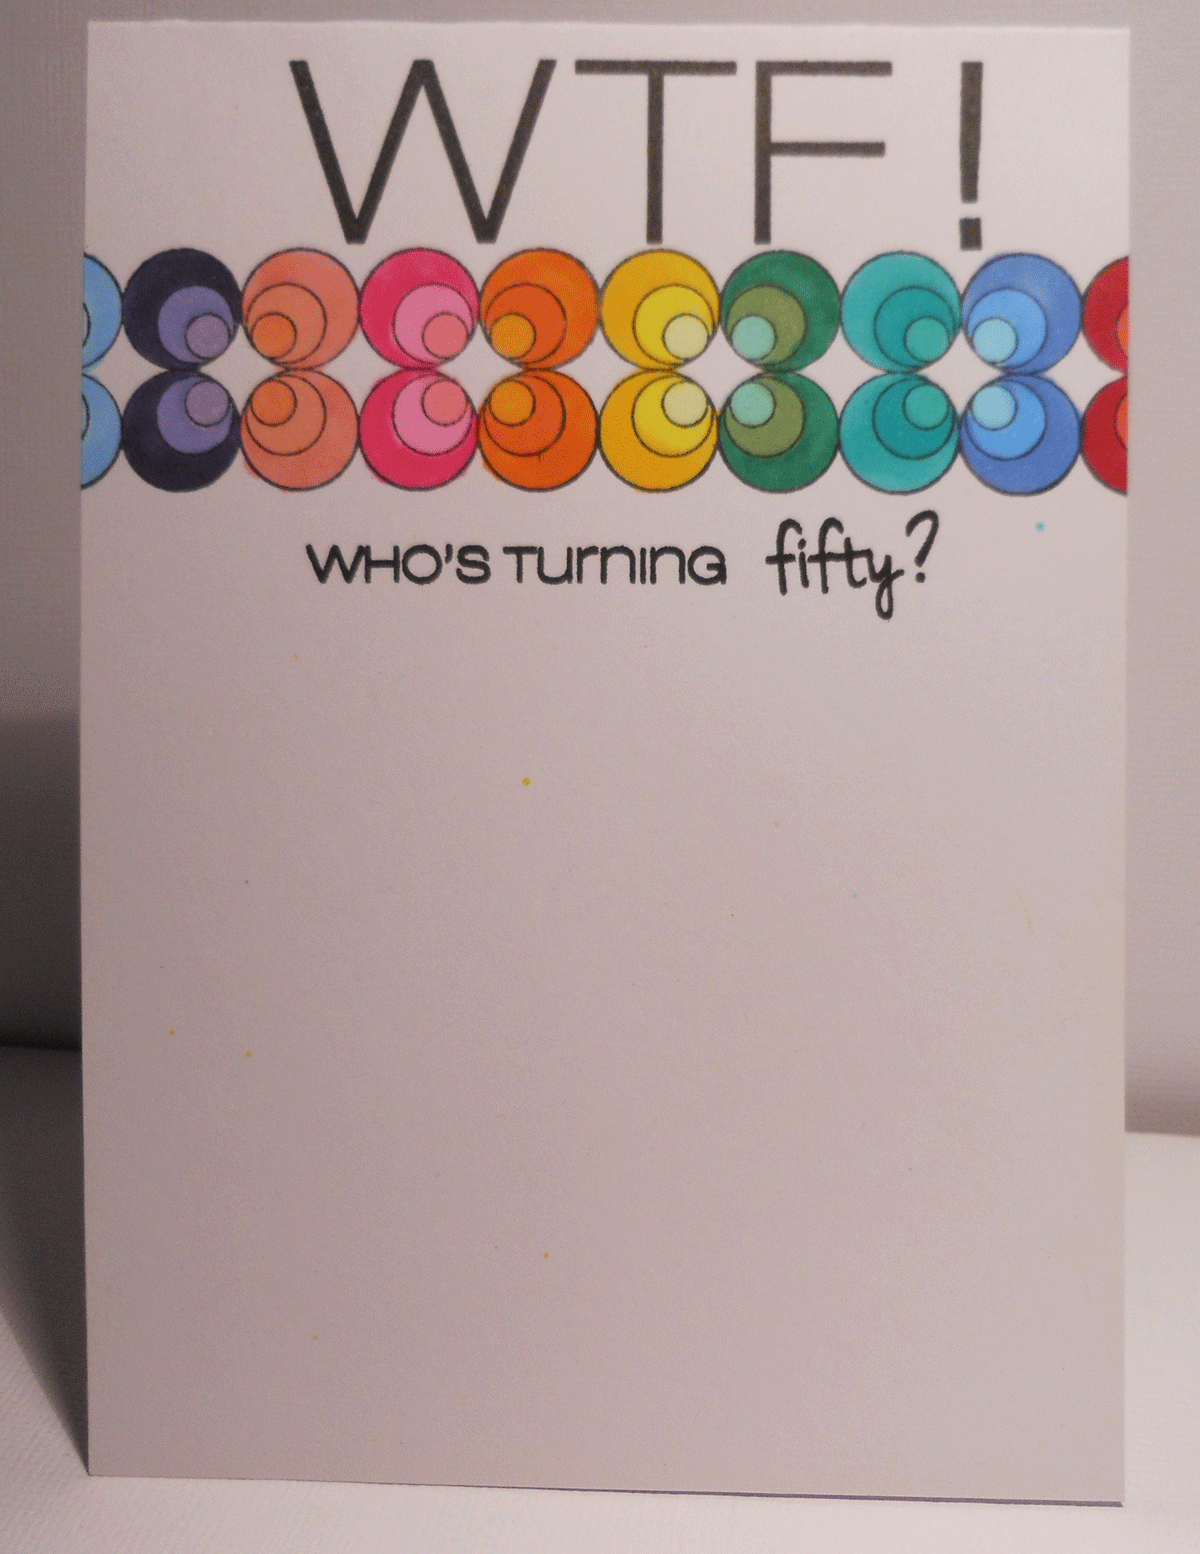
I couldn't resist this stamp set. Took me a while to get it and then of course it sat in amongst the many zillions of NBUS. I am working my way through these sets and of course there are some that I will need to do lots with and this will be one of them.


I have combined two stamp sets as in one is the 'WTF' and the circles are from 'Retro Foundations' The WTF stamp set is:


and one that appeals to those of us that have a bit of a rude sense of humour. Not just limited to 'Who's turning fifty'. I love it and cant wait to do more.

The circle stamp is part of a set from Crafters Meow and has been used before which I'm pleased to say as this company has closed. Which is a total shame as I have a number of their stamp sets that I totally love (the rose and butterfly set being one that has seen much use)


Anyway as you can see here its very simple easy card. After stamping the row of circles I then coloured with copics in a nice rainbow of colours then I stamped the two sentiments. Easy peasy!!

Going to add this to a couple of challenges:

Oooooh only 2 days left....will be sad to finish.


I was hoping to make a pocket card but never got there so will go without the Twist 
and just stay with a birthday card.

Thank you for coming to have a look and I hope you visit again soon.


Friday 30 October 2015

Celebrate with a bit of Sparkle


I know I said I had finished posting for today but I saw Simply Less is More Challenge and had been thinking on some ideas and there was only six hours left to post so it couldn't wait till the morning.


I received this brilliant star die in the mail this week and haven't had a chance to play with it yet. It cuts the stars and the outline so I did one cut in black and one in silver then put the silver inner cuts within the black frame. It is actually longer than you see here but for the challenge I wanted to enter my card in I needed to trim off about a quarter of the length.

I wanted to just stay with silver and black so it could be used as either a card to Celebrate someones success at something or to Celebrate Christmas. Being close to midnight the light isn't the best but you can see the sparkle there.

I finished off with the 'Celebrate' word die that is one of a set of three I think. All are long and the writing is quite small so I am finding that I am not getting much use out of these sentiment dies. But here it works a treat.

So now to connect to


Would also like to enter 

After entering this at Cute Card Thursday I'm not sure if it fits the rules as I haven't done any stamping, its all die cuts. So please excuse my error if I got it wrong.


Okay time to go do the link. Thanks for coming to have a look and I hope you visit again soon.


I wuv you.


Another of Mo's digital images. I had to get this one when I saw it so I could make a card for my granddaughter just cause its cute. This is just like the look on her face when she got her new little doll.

Coloured with copics and done in under 10 minutes easily. Still need to make into card and might add a wee bit of bling to the little flowers on her dress.

Linking up to

My apologies for the increased posts on one day and this is the last one for today.  I hope you enjoyed checking out my posts and you come again soon.


Going to the Ball


This time I have used a digital image from 'Saturated Canary'. Once I had finished colouring her in went around her with a plan blue outline and messed it up as I went so then I went wider and as you can see I ended up making the blue look like its pulling in all directions. I was getting ready to make the card and really liked the effect I have achieved with the background but then decided I wanted to take it a bit further and blend out to white so this is it waiting to get finalised before I add to card front.

Hoping I can do just a bit more and retain the look I have achieved.......or maybe I should just leave well enough alone. I cant bare the thought of ruining it when its nearly completed, decisions, decisions!!

Adding to

Thank you for coming to visit and I hope you come again soon.

Bow to your partner........


Just a couple of quick posts now for the Daily Marker Challenge. No Card, just colouring.
Both of these little cuties are done with........yes you guessed right - copics. I love them, they are so fast and quick to colour with.
Again these are Mo's Digital images. I have a combination now of both Digital and rubber stamps. One thing I like about digital is that you can set up a scene with other digital images if you want even combining a couple of images together. I have done that before but I do stay within the artists images, I don't combine different images from different artists as I am pretty sure it would not be the wanted by them.

I also like that I can make the image big enough to be the whole front of the card or small so I can do little images or parts of an image.


This cutie is more a Honey Blonde with her pink tutu. Once I had finished colouring I used a glue pen and scribbled on the little girls tutu and then added glitter. Used Kindy Glitz to add her hairband. Look at the little dimples at the back of her arms.


This little sweetie is with the purple copics and more sun kissed with her blonde hair.
This time when I added the glue I used a thicker glitter that I had in my stash but wasn't so happy with it. It looks better in real life than here but still won't use again.

Also used the Kindy Glitz to add the hairband. Will make a couple of cards later but for now

will add to

Thanks for coming to visit and hope you come again soon.


You make me Smile.


Another of Mo's wonderful stamps. She creates these stamps that just pull at me. I have such a collection and it never ends cause she keeps coming out with more.


This one just makes me think of the bond that I see between children and their pets.  
Whether the dog would be happy to have someone laying on his back and probably dribbling into his fur is another matter.

This image was coloured with Copics, very basic colouring. Very little fuss. After I finished I decided not to add any bling or glitter just to keep it soft and gentle.

Decided a pale yellow cardbase, then the pale green die cut stitched rectangle. Layered them up gluing straight onto each layer. Stamped ' You Make me' sentiment then attached the 'Smile' die cut that I had cut one layer in white then another in black.

Would like to add this to


Thank you for coming to visit and I hope you come again soon.

Tuesday 27 October 2015

Hello Birthday Girl


Time to squeeze one more card in before I head down to Canberra again for more specialist appointments for both mum and dad and to catch up with the rest of the family.  


Took this closeup so you can see the shine on the t-shirt. Only did the t-shirt with Wink of Stella.


I'm really pleased with how her hair turned out, still learning but loved this result. Puppies with different greys.


The paper at the side is from another paper pad, looks so cool and die cut the 'hello'.
Finished off with stamping 'birthday girl'.

Enter this into

(think I am nearly caught up) So sad its ending soon I really love pushing myself but most has been copic this time. Think I might set myself Inktense pencils for next one (hehehe if I remember)


lucky that was the twist as I didn't do a pocket card but can still enter


Thank you for coming to have a look and I hope you will visit again soon.


Pretty Floral


I needed a pretty floral card that I could throw together quickly. Found this image I had stamped on watercolour card but didn't have time to watercolour. As you can see I did a small amount of masking so I could bunch the flowers and add some leaves.


I used copics which was quick and easy and and finished off with Wink of Stella that does show up here but truly looks blingy here. Did a light blue outline and some little sparkly gems.


Used a new die that I have that cuts the rectangle and little dots so you can imagine the number of little dots that went flying as I was removing them from the border. Did the same size mat in pink and then attached both at an angle (or is that angel I never know as I cant hear the difference).

No sentiment needed as it looked good without and had plenty written in it.

Will add this to


I love bright colours and especially pinks and orange together. They are so vivid and make me think of happy days and warm weather.

Thank you for coming to visit and I hope you come again soon.


Sunday 25 October 2015

Sunshine, you make me happy when skies are grey.


Yes I know it says 'grey' on the stamp but finding one with the correct spelling for here in Australia is near impossible and I have a couple of stamp sets that use the 'gray' so I just ignore our regional spelling for the time being.

The flowers are a digital stamp and I have gone blank at the moment on who's it is. I am currently cataloging all my digital stamps and trying to make sure they are listed under the correct name for who made them but I have way tooo many to complete this quickly.

Many I can tell you who it is very quickly as I mostly buy from the same people but there is a fold that contains beautiful images and many times they are only one or two from a particular person and they have no corresponding pdf with ownership and rules of use so that makes it a bit harder. It means I sometimes spend hours looking, getting sidetracked and end up buying more.

Enough on that subject. Back to the card.


As you can see I have copic coloured, its a really eye catching bunch of flowers. I used the negative from a die cut that I made out of the orange and turned it into a frame for the flowers.
Stamped my sentiment and attached a die cut 'Sunshine' sentiment.


Here it is close up. Simple quick and easy to do.

Will add this to


will also add to


Its hard to find challenges when I'm busy using spring colours and 
everywhere is talking Fall/Autumn and Halloween.


Definitely hand coloured with copics.

Thank you for coming to visit and I hope you come again soon.


Saturday 24 October 2015

Make a Wish


This is another instance where I have been able to use a piece of paper from one of my stock pile of 
6 x 6 pattern paper pads. Isn't it perfect for the bak ground and it makes the card so easy. I did blend a wee bit of distress ink, one of the darker blues around the upper edges and it looks quite good IRL. I not know why it looks more patchy and like I blobbed it on cause it really isn't.

Anyhooo this image is another Saturated Canary Digital. Isn't she a sweetie.


Did her hair in a few different browns. Pale green on the dress, just one colour used. Then a bit of mauve for the stockings again one colour and a darker green for the eyes and purple for the lips.

After I was finished colouring I used clear stickles to add to the spots on her dress to add sparkle and 3D look.


Used the Make a Wish sentiment die and just did some surgery on the 'a' as it looks so strange in its original form. When I first got it and cut the words out I spend quite a while looking at the 'a' trying to work out what it was as it looked more like a 'w'.

Anyway to finish the card off I added to silver stars, one solid star and the cut out one on top with some dimensional tape.


Very pleased with the end result.

Would like to enter this in


Thank you for coming to visit and I hope I see you again soon.


Copic Online Class Day 3


Todays copics class was all about using grey to add shadow and use less layers of ink. Loved it.


Tried different colour combos and also some of my newer inks that arrived just in time. I am trying not to over buy but I do love copics and I am enjoying extending my light colour range. Feel I only need a few more to complete my collection of what I like using.

As you can see here I'm still along way off being there but felt I was getting better as I went.
Unlike Ruth I haven't put any of my images to use, and I'm not sure I will as I like having them there with my colour chart as I complete each section I can see what works, what doesn't and what could do with a slight change.

 I love looking at what Ruth has been doing with her colouring and her latest set of cards combined with the coffee mugs, some new stamp sets and some lovely die cutting and matching envelopes are truly worth a look. Go to Crafting While the Baby Naps

Its interesting seeing the difference of using the different greys. I only have three C1 C3 and C5 so I work with those. I am unsure the difference between C (cool??) and W (warm) but I am learning that it can really depend o the depth of the colour as to whether a darker version is needed. I used C1 on most but when I used C1 on a slightly darker colour it gave a funny like smokey layer and as soon as I changed to C3 it then looked like shadow.

Im looking forward to building on this skill and maybe not wasting as much ink as I tend to do as I try to even out my shadows.

Thanks for coming to have a look and hope you come again soon.

Also want to link this up to

Still three days behind with posting. Must catch up.

Thursday 22 October 2015

Just a Note and Thank you

This is another two cards  that I did at the same time as I did the pink one yesterday. These are done in blue, one a full size card and the other a little note card.


The smaller card was because the panel I coloured is a smaller one. After colouring with copics I fussy cute around the frame and bits of the flower and adhered to a piece of Blue cardstock which was then added to a piece of white cardstock. Added a couple of enamel dots and stamped the 'Just a Note' sentiment.


In this instance the coloured panel is longer so I did a standard card size. Stamped 'Thankyou'


Here you can see the flowers close up and the blue coloured paper is textured and really finishes the card off perfectly.

Again I will add this to 


Thank you for coming to visit and I hope you come again soon.


Just a little something especially for you.


I love how this turned out. Talk about the perfect colours together. Purple and green YAHOOOO.
The image I have coloured in with copics and then covered wings and things with Wink of Stella sparkle. Can see it a bit in the close up photo but really its just sparkle land.


After colouring this image in I then die cut with a stitched rectangular die. Placed at an angle on the coloured paper that was adhered to the base of the card.


the green and purple paper I would love to claim as mine and water coloured but I would be lying. I wish it was done by me and I will be trying this weekend to achieve this look. It is a sheet from a patterned paper 6 x 6 pad. Totally highlighted the coloured image.

This cute little fairy and squirrel is a digital image from  Funky kits Sugar Nellie. I have quite a number of images that I have printed up but not coloured yet so they join my NBUS schtuff (lucky they are virtual till printed up or you couldnt move at my place).

Will send this off to 


Thought I would enter my first challenge at 


Wednesday 21 October 2015

Happy Birthday Pink flowers


I love using this flower image when I need to do a quick card. This time I coloured with copics in soft pinks. After I had coloured I cut around the frame and the flowers that hung outside the frame.


Very pretty and simple to do. Placed on some pink card stock that has a slight texture. This was then added to a white cardbase, couple of gems added that had been coloured with the same copic colour I used. Stamped with 'happy birthday' sentiment and thats it.


not going with the Option (Sketch)

Thank you for coming to have a look and I hope you come again soon.

PS My apologies for three blogs on same day. Not sure if you can do all on one post or when entering challenges they need to be done separately - anyone with an opinion, your comment would be welcomed.


Give a girl the right shoes.........


Brilliant stamp. Finally used this stamp. I masked the sentiment the first time I stamped to that I could do gold embossing of the shoes the first time. Then masked the shoe so I could clear emboss the black stamped sentiment.


I then coloured the shoes with gold watercolour and when that was dry added Wink of Stella. The sole of the shoe and the legs I did with copics. The feet and legs I just did a faint outline asI felt that was all that was needed.


Added a little sparkle to the toe nails as well not that you can really see but I am very happy with how this turned out. Left the card plain as I felt the shoes and sentiment were all that was needed.

Would like to enter this at


and

As this is the first time I have used this stamp.

Gold and Brown

Thank you very much for coming to have a look andI hope you come again soon


Best Friend Ever


I have been so busy colouring in that my computer on the desktop has a pile of photos that are waiting to be blogged. I leave them on the desktop so I don't forget them and its getting hard to find anything else so I thought I better blog some.

This beautiful card is using a Mo's Digital Pencil image. Isn't she just the cutest little cutie with her little button lips and the way she is looking at the bear.
Mo has such a talent for drawing the most amazing images and if you are not into digital then many of her images  are available as stamps as well.
I totally enjoyed colouring her in with copics and used a stitched rectangle die to make a frame for her as the tree and swing just end mid air. I did do some additional length to the branches and the rope just slightly as I wanted to use this die and it wasn't quite a perfect fit without too much clear underneath.

I added bits of white with my Uni-ball Signo white pen(the best I have used so far) and added glossy accents to all the apples. Her dots on her pants look 3D in the photo.

Will add this to


Would also like to enter


Thank you so much for coming to visit and I hope you come again soon.